Friday, May 07, 2010

“Page Cannot be found” error when browsing aspx pages in Windows Server


You may be frustrated with a “page not found” error when attempting to execute your .aspx page. If you have a static “index.html” page, everything looks good.

The problem lies in the fact that by default, in windows Server-2003, all extensions are disabled. Its understandable, as its a server environment, and its safer to let the administrator specifically enable a setting, than auto enable it.

Here are the steps to resolve this:

  1. In “Run” dialog, type in “inetmgr” or start IIS administration.
  2. Go to “Webservice Extensions” node
  3. Enable the required extensions. For ASP.Net to work, enable the extensions as shown in the screen shot.
  4. Try accessing your page again, and everything should be working now.

image

Detect DirectX version installed in your system


Here are the steps to detect directX version installed in your system:

  • Select Start—>Run, or <windows key> + R, and type in “dxDiag”
  • You will get a dialog which shows you the directx version, as shown below:

image

Tuesday, April 13, 2010

Setting admin password for fresh Tomcat installation

When tomcat server is installed for the first time in your local machine, and you point to : http://localhost:8080, and try to access admin console, you will be presented with the admin userID/password. However, you have no idea what the userID/password is!!.

Tomcat does not come with an admin userID/password. Instead, we are going to create one.

First, go to “<Tomcat Installation Directory>\conf” folder. Here, you will see a file named “tomcat-users.xml”. Open this file in your XML editor, or notepad. Change the file to look like the following:

<?xml version='1.0' encoding='utf-8'?>
<tomcat-users>
  <role rolename="manager"/>
  <role rolename="tomcat"/>
  <role rolename="admin"/>
  <role rolename="role1"/>
  <user username="both" password="tomcat" roles="tomcat,role1"/>
  <user username="tomcat" password="tomcat" roles="tomcat"/>
  <user username="admin" password="adminpassword" roles="admin,manager"/>
  <user username="role1" password="tomcat" roles="role1"/>
</tomcat-users>


Make sure you change the admin passwords to something more secure. I just used “adminpassword” as the password here for ease of understanding.

That’s it!!. Restart the Tomcat server, and you should now be able to log in as admin.

Friday, March 12, 2010

Windows 7 God Mode

Here is a trick to get access to all of Windows 7 configuration settings in one single place. Follow the following steps:

  1. Create an empty folder
  2. Name this folder : “GodMode.{ED7BA470-8E54-465E-825C-99712043E01C}” , of course without the “.

    image
  3. The folder icon will now change into a shortcut.

     image
  4. Double click on this new shortcut, and get access to all the feature settings – Some of which you didn't even know existed!

Friday, February 12, 2010

Useful Workflow Administration Transactions

I am in the process of learning workflows in SAP, and thought of documenting couple of workflow administration transactions that are pretty useful. If you are interested in learning more about workflows, consider this book. Its the one I am using and find it very useful.


Reporting on Workflow Progress

Workflows For Objects SWI6
Workflows for Object Type SWI4

Reporting on Workflow Performance

Work Items by processing duration SWI2_DURA
Work Items with monitored Deadlines SWI2_DEAD
Number of work items processed per period SWI2_FREQ
Work Load analysis for agents SWI5


Support tools for Agent Determination problems

Execute rules for work items SWI1_RULE
List of work items without agents (Orphaned Work items) SWI2_ADMI
Execute work items without agent check SWIA


Resolving Buffering errors (The Cinderella Principle)

The SAP system buffers/keeps a copy of different data in memory to improve overall performance. This is particularly prevalent in organizational management related entities like Org Units, Jobs, Positions, agents, tasks and relationships between them. Buffering problems can also occur when there is a change in task definition, or after transporting new workflows or versions of workflows into a system.

The buffering while important for system performance, may cause issues in the over all working of workflows. Typically, the system refreshes its buffer every midnight. So, the problems caused may be temporary. Its not uncommon to work on an issue all day, and come back the next day to find the problem does not even exist!!!. More frustrating is the realization that what ever changes/tries you made the previous day, in an attempt to “fix” the issue have to be reversed.

The above scenario is called “Midnight Magic” or the “Cinderella Principle” (i.e.) everything back to normal after midnight.

Solution to the above problem is either to wait a day, or more practically, synchronize the run time buffer.

To synchronize the runtime buffer, use the transaction : SWU_OBUF

After executing the above transaction, some workflow functions may have a performance hit. But this performance hit will go away, as the buffers are rebuild.

Some More Support Tools

Diagnosis of workflows with errors SWI2_DIAG
Deadline monitoring for work items. This transaction is useful to control the working of background job which monitors deadlines. SWWA
Background job/report that monitors work item start or end steps RSWWICOND
Continue workflow after system crash SWPC

Monday, November 30, 2009

Mapping MobileMe iDisk in Windows

I have a mobile Me account, which is integrated with my IPhone. The subscription comes with a 20GB space for storage. However, I rarely use it to upload photos..etc, and the space is pretty much a waste.

So, I started exploring ways by which I could use that space as an online storage of my files (Something like Drop Box, but have much more space)

The following steps details how to map a network drive in windows 7 to the iDisk folder:

  1. Open windows explorer, and go to Tools—> Map Network Drives…If the “Tools” menu is not visible, try pressing the “ALT” key
  2. In the network drive mapping dialog, enter the folder path as : http://idisk.me.com/<username>, where, <username> is your signin userid which you use at http://www.me.com image
  3. Check the “Connect Using Different Credentials” checkmark
  4. Click on “finish”, and enter your mobileme credentials when asked. Thats it!!!

Enjoy putting your iDisk in Mobile Me account, to use.

Thursday, August 13, 2009

Finding BADI in any SAP transaction

One of the options to consider when a need arise to change the standard out of the box SAP feature is to take advantage of Business Add ins , or in short, BADIs. BADIs are basically exit classes which are integrated in the SAP transaction program, and are called during execution, usually with run time variables which can be modified. By taking advantage of these BADIs, application developers can change these variables during run time, based on the business rules, and transfer the values back to the main SAP transaction application, there by modifying the way in which standard out of the box SAP transaction work.

The 2 transactions of notice when coming to BADIs are SE18 and SE19, where we implement the BADIs using our own classes. These classes use the same interface as that of the BADI class.

Having said that, many a times, the issue I have run into, especially in a new environment is how to find these exit points/BADIs that are available for a given transaction. One option is to spend a very long time debugging and keeping a close eye on each and every call that is made in the SAP program. However, this is not an option when it comes to web transactions because web applications time out.

The BADI class we implement is considered an Instance of the actual BADI class. For SAP to find out if a BADI has any active implementations, it first calls a static method called “getInstance()” of class : CL_EXITHANDLER. If we set a break point within this method, the execution will break for every single BADI that is implemented in the SAP transaction.

Hence, set a Break point in: CL_EXITHANDLER=>GET_INSTANCE()

While this is a sure shot way of finding BADIs in a transaction, the down part of this method is that there will be too many break point hits. The most effective method to find BADIs is to go to SDN and check out the user forums. However, if all else fails, the method I detailed below will get you the BADI you are looking for.

Tuesday, February 17, 2009

Controlling Servo Motor Positions using Duration in Parallax Basic Stamp BS2


One of the problems I came across when attempting to control a servo motor was the position of motor horn. It is a well known fact that the servo motor need pulses for it to work. This is achieved by raising voltage on control pins (Hi), Making it Low (LO), and then, pausing for set amount of time, say , 20 ms. The “Raising” and Making “Low” can be achieved using the PULSOUT command. The syntax of PULSOUT command is as follows:

PULSOUT <pinNumber>, <Duration>

The Pin number is an obvious parameter (Doh!), but the Duration part is a bit tricky, because the unit of Duration is actually 2 micro Seconds (written as 2us from now on).

Hence, the following command:

                    PULSOUT 14, 1

Will result in getting a pulse to pin 14, with HIGH lasting for just 2us, and then becoming LOW. Lets see another example:

                    PULSOUT 14,1000

will result in getting a pulse to pin 14 with HIGH lasting for 1000*2us  = 2ms. The relevance of this duration discussion will become evident in just a second. Basically, it is this duration, that determines the positioning of a servo motor horn / amount of turn that the motor will do when its given control pulse. This pulse train needs to be sent to servo motor once in say 10 – 30 ms. Hence, to hold a motor on a particular location, we use FOR loops and PAUSE statements, as you will see in the example shortly.

For now, here is a diagram which gives an idea of durations and locations. This diagram was got from Parallax forums, where one of the best teacher, Andy Lindsay posted the information.

Servo Position Control WRT a Clock's Hour Hand

As you can see from the above diagram, to achieve a horn position of 12:00 O Clock, the following can be used, assuming the control pin is PIN 14:

PULSOUT 14, 750

Similarly a 9 O’Clock position –> PULSOUT 14, 1250

3 O’Clock Position –> PULSOUT 14, 250

As we can see, as the duration becomes higher than 750, the movement becomes counter clockwise. With duration lesser than 750 (which = 750* 2us = 1.5 ms ), the motor turns clockwise.

Now, with that “mystery” duration out of our way, lets see an example which will turn the servo motor Counter Clockwise, Clockwise, and then, to 12 O’Clock position. This is the program I came across when starting my robotics/electronics/microcontroller studies, and got utterly confused on how/why the servo motor was behaving as it was. The following program was available in the Microcontroller tutorial book by Parallax, written by Andy Lindsay. After the book was published, with many people having the same question, Andy Lindsay published an extra page on this topic in Parallax forum site. The following URL will take you there:

http://forums.parallax.com/forums/default.aspx?f=6&m=164400

Now, to the program:

********************************* Begining of program *******************

  counter VAR Word

DEBUG "counterclockwise 10 oclock", CR

FOR counter = 1 TO 150
   PULSOUT 14, 1000
   PAUSE 20
NEXT

DEBUG "clockwise 2 oclock", CR

FOR counter = 1 TO 150
   PULSOUT 14, 500
   PAUSE 20
NEXT

DEBUG "center 12 oclock", CR

FOR counter = 1 TO 150
  PULSOUT 14, 750
   PAUSE 20
NEXT

DEBUG "all done"

END

*********************************End Of Program *************************

The First Loop

DEBUG "counterclockwise 10 oclock", CR

FOR counter = 1 TO 150
   PULSOUT 14, 1000
   PAUSE 20
NEXT

First, the servo motor will get 150 pulse signal trains, each HI lasting for 1000 * 2us = 2ms duration. After each such signal, the PAUSE 20 will insert a delay of 20 milliseconds, and the loop continues. As per our discussion earlier, regarding the duration and location of servo motor horn, we understand that the servo horn should come somewhere near 10 O’Clock position. Once it reaches the position, the motor will hold that position for some time. Now, how much time does it hold that position? Lets find out…

Each loop has a pause of 20 ms. Also, each pulse last 2 ms. Hence, total delay in the loop = 20 ms (from PAUSE) + 2 ms (from duration of PULSOUT) = 22ms.

Hence, total time required to execute the first 150 loops
                                       = 22 * 150
                                       = 3300 milliseconds
                                       = 3.3 Seconds.

The Second Loop

DEBUG "clockwise 2 oclock", CR

FOR counter = 1 TO 150
   PULSOUT 14, 500
   PAUSE 20
NEXT

Now, lets consider the second loop. Here too, the servo motor will get a train of 150 pulses. But this time, the duration parameter is 500. This means that each pulse will last only 500 * 2us = 1ms.

From what we have seen in above duration/position explanation/diagram, we understand that the servo motor will move to a location somewhere near to 2 O’Clock position, and hold the position. Again… for how long? Lets find out:

Each loop as a pause of 20ms, because of the PAUSE command. Also, each pulse last 1 ms.

Total delay of loop = 20 ms (From PAUSE) + 1ms (from PULSOUT)
                            = 21 ms.

Total time required to execute 150 loops
                            =  21ms * 150
                            = 3150 milliseconds
                            = 3.1 Seconds.

I leave it to you to figure out how the 3rd and final loop works.

Food For Thought

Before concluding this post, let me discuss how to control the time for which the servo motor holds a position. Remember.. in real world though… we may be using an infinite loop to get input from say, a switch/sensor, to control the motor. But for this example, we can control the time and speed in which the motor moves by changing the number of loops and the PAUSE parameter. In the first loop, increasing the PAUSE duration will result in the servo motor getting to the intended position more slowly, and then holding the position.

However, if you want to motor to reach its position fast, and THEN hold the position, leave the PAUSE duration alone, but increase the number of loops. Think about it … :).

Thursday, January 22, 2009

Visual C# Ternary operation

Right from my days of C++, this ternary operation has always confused me, primarily because I never spent enough time to understand this operation. Now that I have, I am documenting it here so that this can be referred back in future if needed, or for others like me.

The only ternary operation in C# is the comparison operation which has the following syntax:

<test>?<resultIfTrue> : <resultIfFalse>

Example:

string resultString = (myInt<10) ? "Yep!!!!" : "Nope!!!"

Here, the resultString variable will hold the string "Yep" if the variable myInt has a value less than 10. Otherwise, if the value held by myInt is greater than or equal to 10, the variable resultString will hold a value "Nope!!!".

Tuesday, January 06, 2009

Useful SAP Business Object Type programming macros.


Figuring out the Key to instantiate an Object

Go to SWO1 transaction and display the object type you want to instantiate. Now, at the top, click on the "Program" button, as shown in the figure.

1-6-2009 2-36-18 PM

You will notice that there is a section starting with "BEGIN OF KEY" and ending with "END OF KEY". This is your key declaration. You will want to create a type of the same structure in your ABAP application, before you can instantiate the object type in your application.

Instantiating a Business Object

To instantiate a business object, first create a Type/structure using aforementioned technique. For the above object, the type declaration will be as shown:

REPORT  zgn_object_create.

DATA: BEGIN OF objkey,
    airline LIKE sflight-carrid,
    connectionnumber LIKE sflight-connid,
    flightdate LIKE sflight-fldate,
END OF objkey.

One More Step Before Using the Business Object Programming Macros

All the macros we are going to discuss here is defined in the include program "CNTN01". Hence, the first step before using any Business Object Programming macros would be to include CNTN01 object in the application like so:

REPORT  zgn_object_create.
INCLUDE <cntn01>.

DATA: BEGIN OF objkey,
    airline LIKE sflight-carrid,
    connectionnumber LIKE sflight-connid,
    flightdate LIKE sflight-fldate,
END OF objkey.

SWC_CREATE_OBJECT - Instantiate Object Reference.

The SWC_CREATE_OBJECT macro is used to instantiate a business object. The syntax is as follows:

SWC_CREATE_OBJECT <Object> <ObjectType> <ObjectKey>

All object references, irrespective of the actual object type, have the data type definition SWC_OBJECT.

For example, for instantiating a customer object, the following could be the code.

Data Customer TYPE SWC_OBJECT.
SWC_CREATE_OBJECT Customer 'KNA1' customerID.

SWC_GET_PROPERTY - Macro to get a single valued attribute

SWC_GET_PROPERTY macro can be used to access single valued attributes from object instance. Syntax is as follows:

SWC_GET_PROPERTY <Object> <Attribute> <AttributeValue>

When attempting to access attributes of the same object (say, when developing methods, you want to access the attributes of the object), we can use "self" as the object name. For example, to access an attribute "Name", the following can be used:

SWC_GET_PROPERTY self 'Name' namevalue.


SWC_GET_TABLE_PROPERTY - Macro to get multiple value attribute

SWC_GET_TABLE_PROPERTY macro can be used to access multiple valued attributes (Multi Line attributes). Syntax is as follows:

SWC_GET_TABLE_PROPERTY <Object> <Attribute> <Value>

For example, to get a list of all movies playing in a theatre, the following can be used:

SWC_GET_TABLE_PROPERTY Theatre 'MovieList' Itab_movies.

Where,

Theatre is the Object Instance

MovieList is the attribute name (Multi Line Attribute)

Itab_Movies is an internal table to hold the values of the multi line attributes.


SWC_SET_ELEMENT - Macro to set a single valued attribute

SWC_SET_ELEMENT macro can be used to set single valued attributes in an object instance. Please note that this macro can be used only within an object method. Syntax is as follows:

SWC_SET_ELEMENT CONTAINER <AttributeID> <Value>

Because there is no object reference in the syntax, it is obvious that the use of this macro is pretty much restricted to within a method in the object instance.  This in one way is a good thing, as this makes it impossible to modify the attribute values of a business object directly. If we have to modify the attribute value of a business object, we have to use the object methods, and use the set element macro inside that method.

SWC_SET_TABLE - Macro to set muti line attribute.

SWC_SET_TABLE macro can be used to set multi line attributes in an object instance. Please note that this macro can be used only within an object method. Syntax is as follows:

SWC_SET_TABLE CONTAINER <AttributeID> <Value>

As mentioned before, since this macro does not have an object instance reference, this macro can be used only inside an object method, adding a layer of control on changing attribute values of a business object instance.


EXIT_RETURN - Return exception information from a method.

When developing the business object methods, it is important that any problems that the method encounter be properly communicated back to the caller. This may not be a very strict requirement when making the method calls from ABAP programs. But, this is a big issue when making the method calls from work flows (Tasks). Raising an exception, and giving information back to the framework that something went wrong in method execution is the only way by which the workflow can take evasive/alternate paths to get the work done (Error Handlers). Since there is no saying where all the business object will be used (may be today, it would be used just in your program, but in future, someone may decide to use your object in a workflow), its always a good practice to raise appropriate errors from methods if something goes wrong. The syntax is as follows:

EXIT_RETURN <Exception> <Var1> <Var2> <Var3> <Var4>.

The EXIT_RETURN macro specifies the exception number and the parameters for the message. Messages can have a maximum of 4 parameters and all the parameters (Var1 tro var 4) are mandatory. So, what if I have only 1 parameter to send? Well, we just use "SPACE" in place of other parameters like so:

EXIT_RETURN <ExceptionID> <Var1> SPACE SPACE SPACE.

Monday, December 22, 2008

Installing SAP GUI version 7.1 in UBuntu Linux

With all the other pieces like VPN..etc in place, the last step in getting on with my work was to install SAP GUI. SAP provides the Logon pad application in windows (as exe), and also, in java. The Java version can be used in UBuntu Linux, provided JRE is installed. Please refer to my earlier post on how to install JRE in UBuntu Linux.

Installing the SAP GUI Client
To Install SAP GUI, first download the SAP GUI Client for Java application from SAP. For this, head to SAP Service Marketplace. Extract the contents of the zip file to a folder and make it available in UBuntu Linux. If you are running Ubuntu as a virtual machine, please refer to my post on how to share folders between host and guest operating systems, in VMWare.

Open a terminal by clicking on Applications-->Accessories-->Terminal. Go to the folder where you extracted the SAP GUI Client, and go to folder containing the file "PlatinGUILNX_6.JAR". This is usually in the folder "PRES2-->GUI-->JAVA".

Once in the folder, type in the following command to begin installation
$ java -jar PlatinGUI-Linux-710r2.jar

Pay attention to where you install the client. By Default, it is in your /SAPClients folder.
Accept/Change the settings, and complete the installation. 

Configuring the SAP GUI Client, and adding SAP Servers
Now that the installation is complete, it is time to start the SAP GUI Client. For this, there are 2 options. 
The easiest option is to use the menu. Go to Applications-->Other, and you should see the SAP GUI client application shortcut.

Another option is to go to the installation folder "bin" directory. By default, this is "/SAPClients/SAPGUI/bin/". Open a terminal, and go to the above directory. In the "bin" folder, you will see 2 files, namely "guilogon" and "guistart". "guistart" can be used when you want to connect to a server without configuring/adding the server to your logon pad. For now, type in "./guilogon" to execute and bring up SAP GUI Client.

One thing to note here is, with the above command "./guilogon", the terminal window is not freed. That means, the prompt does not come back to terminal window, even after the application starts. Also, closing the terminal window will terminate the applicaiton.  To avoid this "lock up" problem, LINUX provides a way to "spawn" a process as separate thread. If you type "./guilogon&", the OS will start the process as a separate thread (Still that thread will be a child of Terminal parent process), but the prompt will come back to terminal, allowing you to use the terminal for other commands. The number you see if you use the latter command is the PID or Process ID of the SAP GUI application. You will need that PID if you want to force terminate the applicaiton using "kill" command.

Ok... so, now, SAP GUI is up and running. To add a server click on "New" button. Give a description, and go to "Advanced" tab.  Check the "Expert Mode" check button. The following is the format for connection string
conn=/H/"server address"/S/32"client ID"

For example,
   If your server IP address is : 192.168.1.44 and the client ID is 10, the connection string will be 
   conn=/H/192.168.1.44/S/3210
  
  Refer to the following screen shot.

That's It!!... You are done. Click on "Save" and connect to SAP system by clicking on "Connect".

Sunday, December 21, 2008

Install and use VPN in UBuntu Linux

One of the road blocks when trying to use Linux was connection to corporate network. My company uses VPN. The Operating system used in my company is Windows XP, and Cisco VPN is the VPN client used to connect to corporate network.

There is Cisco VPN available for Linux, but here, I am going to discuss an easier and more readily available solution. 2 applications are available in Ubuntu Linux. Once these are installed, connecting through VPN is a breeze. 

Infact, I felt that the connecting through Linux was much faster!!! But, what I am writing here is a result of 1.5 days of resarch over the internet, and lots of failures. A part of why it took 1.5 days is becasue I am using VMWare to run UBuntu Linux as a virtual machine, and the VPN connection wont work unless specific network settings are done for the virtual machine. I have detailed this in my earlier post on setting up a virtual machine.

The first step in having VPN client up and runnint in UBuntu Linux is to get the client application. The applications that are to be installed are kvpnc and vpnc. Once these applications are installed, we will be using the same profile file you are using in your present VPN setup, and importing that profile to Kvpnc. The following are step by step instructions on getting the whole VPN setup done.

Step By Step Instructions on Installing VPN Client and Importing VPN Profile
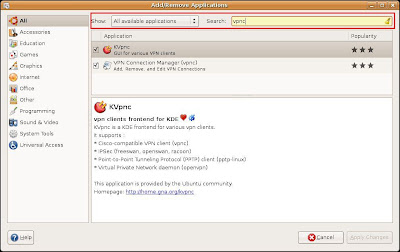
  • In UBuntu Linux, Go to Applications-->Add/Remove
  • Make sure you select "All Available Applications" for "Show", and type in "vpnc" in search box

  • You will get a couple of hits and 2 of them will be "KVpnc" and "VPN Connection Manager (vpnc)".
  • Select BOTH these by selecting the check boxes near them
  • Click On "Apply Changes" button at bottom right corner
  • Now, start your windows machine where Cisco VPN is installed. We are going to copy the VPN Profile file. Go to your Cisco VPN client profiles folder. By default, this is Program Files--> Cisco Systems --> VPN Client --> Profiles. You will see one .pcf file for each connection listed in your VPN client. Copy and make these files available in your Linux installation for our next step. If you are using UBuntu Linux in a virtual machine, like me, Refer to my Blog post for instructions on how to share folders between the Host and Guest operating systems in a VM Virtual machine.
  • Once the installation is complete, start KVpnc by going to Applications-->Internet-->KVpnc
  • Ince KVpnc starts, go to Profile-->Import Cisco pcf file.  Go to the folder where you saved the .pcf files, select the .pcf files you need imported, and click OK. 
  • Your KVpnc applicaiton is now ready for use. Just click on "Connect", provide required authentication information (userID/Password), and you will be connected to the network.

Installing Java Runtime (JRE) and Java Development Kit (JDK) in Ubuntu Linux

This post is a quick "how to" on installing Java in your UBuntu installation. My UBuntu installation is as a virtual machine, using VMWare. Please refer to my previous BLOG on how to set this up.

We will be installing JRE and JDK using apt-get. For this, open a terminal by selecting Applications--> Accessories --> Terminal.

Installing the Java Run Time (JRE)
To install JRE, type in the following command in terminal window
$ sudo apt-get install sun-java6-jre

Installing Java Development Kit (JDK)
To install JDK, type the following in terminal window
$ sudo apt-get install sun-java6-jdk


Install UBuntu Linux using VMWare

Recently I ordered an Alienware PC with 64Bit windows Vista OS. Like many others, I found myself in a fix when some of the softwares required for my work did not work. The Cisco VPN client was on top of the list. Without that, I cannot connect to my work network. I started searching for a solution, and came across VMWare Workstation. Basically, VMWare allows you to install multiple Operating systems as "virtual PC". Read more about this on their website http://www.vmware.com/. You will be able to download a trial version there.


This post is about how I got started on VMWare work station. The first OS I installed was UBuntu Linux version 8.04.1, 32 bit.


To start with, you will need the installation CD for the OS. You will be able to download it free from the UBuntu Website (Free... I like it!!!). Now, dont let the word "Free" fool you... in my experience, once I spent some time with this new OS, I found that pretty much everything I do with windows, i can do with this OS, PLUS, more... the softwares I spent money for getting, in Windows OS, they ALL came free here!! Now, the best part... you stuck with any problem.... head to Google, put the problem in the search box, and you will surely get the solution from those millions of users.


  1. Once you have the Ubuntu Installation CD, its time to create the virtual disk. Start VMWare Workstation. Select "New Virtual Machine"
  2. Select the "Typical" option, and click on "Next"
  3. In the "Install From" page, select the bottom most option which says "I will install the Operating System Later", and click on "Next"
  4. Select "Linux" as the Guest operating system, and in the drop down, select "UBuntu". Click on "Next"
  5. Select a virtual machine name. This is the name which will appear in your list of machines available. For now, leave the location as it is.
  6. Select the amount of hard disk space you want to allocate for this Operating System. I would recommend 10GB if you are serious in working with the new OS with some heavy apps. However, if you are just toying around, or dont plan to do much stuff with it, just give the OS something like 5-6 GB. I have always selected the option "Store virtual disk as a single file". Click on "Next"
  7. In this final confirmation screen, there is one thing we have to change. This change is because in my experience, this is required for VPN to work from within the virtual machine. Now, click on "Customize Hardware" option.
  8. Go to "Network Adapter". Select the option "Bridged: Connected directly to the physical network". Uncheck the checkbox which says "Replicate physical network connection state".
  9. If you are using a Multi core CPU, you can take advantage of this by setting the number of "Processor" as 2.
  10. Click on "Finish" to complete virtual disk creation.
  11. Once back in the initial screen, make sure you have the OS installation DVD in your DVD drive, and select "Power On this virtual Machine". You will see the VMWare logo..etc, and if the CD/DVD is bootable, you should see the OS Installation.
  12. Congratulations... you just created a "OS inside OS"!!!.