One of the road blocks when trying to use Linux was connection to corporate network. My company uses VPN. The Operating system used in my company is Windows XP, and Cisco VPN is the VPN client used to connect to corporate network.
There is Cisco VPN available for Linux, but here, I am going to discuss an easier and more readily available solution. 2 applications are available in Ubuntu Linux. Once these are installed, connecting through VPN is a breeze.
Infact, I felt that the connecting through Linux was much faster!!! But, what I am writing here is a result of 1.5 days of resarch over the internet, and lots of failures. A part of why it took 1.5 days is becasue I am using VMWare to run UBuntu Linux as a virtual machine, and the VPN connection wont work unless specific network settings are done for the virtual machine. I have detailed this in my earlier post on setting up a virtual machine.
The first step in having VPN client up and runnint in UBuntu Linux is to get the client application. The applications that are to be installed are kvpnc and vpnc. Once these applications are installed, we will be using the same profile file you are using in your present VPN setup, and importing that profile to Kvpnc. The following are step by step instructions on getting the whole VPN setup done.
Step By Step Instructions on Installing VPN Client and Importing VPN Profile
- In UBuntu Linux, Go to Applications-->Add/Remove
- Make sure you select "All Available Applications" for "Show", and type in "vpnc" in search box
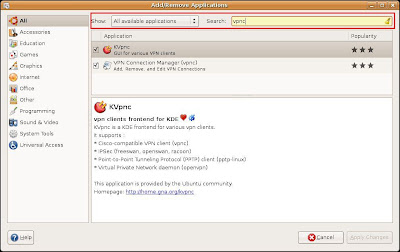
- You will get a couple of hits and 2 of them will be "KVpnc" and "VPN Connection Manager (vpnc)".
- Select BOTH these by selecting the check boxes near them
- Click On "Apply Changes" button at bottom right corner
- Now, start your windows machine where Cisco VPN is installed. We are going to copy the VPN Profile file. Go to your Cisco VPN client profiles folder. By default, this is Program Files--> Cisco Systems --> VPN Client --> Profiles. You will see one .pcf file for each connection listed in your VPN client. Copy and make these files available in your Linux installation for our next step. If you are using UBuntu Linux in a virtual machine, like me, Refer to my Blog post for instructions on how to share folders between the Host and Guest operating systems in a VM Virtual machine.
- Once the installation is complete, start KVpnc by going to Applications-->Internet-->KVpnc
- Ince KVpnc starts, go to Profile-->Import Cisco pcf file. Go to the folder where you saved the .pcf files, select the .pcf files you need imported, and click OK.
- Your KVpnc applicaiton is now ready for use. Just click on "Connect", provide required authentication information (userID/Password), and you will be connected to the network.
1 comment:
Hi Gopal,
nice article, and a great idea as well, to keep a scrap of the work you do.
I have a similar blog, and funny enough using the exact same theme. My articles are not as organised as yours. I shall try and up my game by trying to write better notes.
Feel free to browse through http://blog.sushilsureh.co.uk
Take care
regards
Sushil Suresh.
Post a Comment