Monday, December 22, 2008

Installing SAP GUI version 7.1 in UBuntu Linux

With all the other pieces like VPN..etc in place, the last step in getting on with my work was to install SAP GUI. SAP provides the Logon pad application in windows (as exe), and also, in java. The Java version can be used in UBuntu Linux, provided JRE is installed. Please refer to my earlier post on how to install JRE in UBuntu Linux.

Installing the SAP GUI Client
To Install SAP GUI, first download the SAP GUI Client for Java application from SAP. For this, head to SAP Service Marketplace. Extract the contents of the zip file to a folder and make it available in UBuntu Linux. If you are running Ubuntu as a virtual machine, please refer to my post on how to share folders between host and guest operating systems, in VMWare.

Open a terminal by clicking on Applications-->Accessories-->Terminal. Go to the folder where you extracted the SAP GUI Client, and go to folder containing the file "PlatinGUILNX_6.JAR". This is usually in the folder "PRES2-->GUI-->JAVA".

Once in the folder, type in the following command to begin installation
$ java -jar PlatinGUI-Linux-710r2.jar

Pay attention to where you install the client. By Default, it is in your /SAPClients folder.
Accept/Change the settings, and complete the installation. 

Configuring the SAP GUI Client, and adding SAP Servers
Now that the installation is complete, it is time to start the SAP GUI Client. For this, there are 2 options. 
The easiest option is to use the menu. Go to Applications-->Other, and you should see the SAP GUI client application shortcut.

Another option is to go to the installation folder "bin" directory. By default, this is "/SAPClients/SAPGUI/bin/". Open a terminal, and go to the above directory. In the "bin" folder, you will see 2 files, namely "guilogon" and "guistart". "guistart" can be used when you want to connect to a server without configuring/adding the server to your logon pad. For now, type in "./guilogon" to execute and bring up SAP GUI Client.

One thing to note here is, with the above command "./guilogon", the terminal window is not freed. That means, the prompt does not come back to terminal window, even after the application starts. Also, closing the terminal window will terminate the applicaiton.  To avoid this "lock up" problem, LINUX provides a way to "spawn" a process as separate thread. If you type "./guilogon&", the OS will start the process as a separate thread (Still that thread will be a child of Terminal parent process), but the prompt will come back to terminal, allowing you to use the terminal for other commands. The number you see if you use the latter command is the PID or Process ID of the SAP GUI application. You will need that PID if you want to force terminate the applicaiton using "kill" command.

Ok... so, now, SAP GUI is up and running. To add a server click on "New" button. Give a description, and go to "Advanced" tab.  Check the "Expert Mode" check button. The following is the format for connection string
conn=/H/"server address"/S/32"client ID"

For example,
   If your server IP address is : 192.168.1.44 and the client ID is 10, the connection string will be 
   conn=/H/192.168.1.44/S/3210
  
  Refer to the following screen shot.

That's It!!... You are done. Click on "Save" and connect to SAP system by clicking on "Connect".
Sunday, December 21, 2008

Install and use VPN in UBuntu Linux

One of the road blocks when trying to use Linux was connection to corporate network. My company uses VPN. The Operating system used in my company is Windows XP, and Cisco VPN is the VPN client used to connect to corporate network.

There is Cisco VPN available for Linux, but here, I am going to discuss an easier and more readily available solution. 2 applications are available in Ubuntu Linux. Once these are installed, connecting through VPN is a breeze. 

Infact, I felt that the connecting through Linux was much faster!!! But, what I am writing here is a result of 1.5 days of resarch over the internet, and lots of failures. A part of why it took 1.5 days is becasue I am using VMWare to run UBuntu Linux as a virtual machine, and the VPN connection wont work unless specific network settings are done for the virtual machine. I have detailed this in my earlier post on setting up a virtual machine.

The first step in having VPN client up and runnint in UBuntu Linux is to get the client application. The applications that are to be installed are kvpnc and vpnc. Once these applications are installed, we will be using the same profile file you are using in your present VPN setup, and importing that profile to Kvpnc. The following are step by step instructions on getting the whole VPN setup done.

Step By Step Instructions on Installing VPN Client and Importing VPN Profile
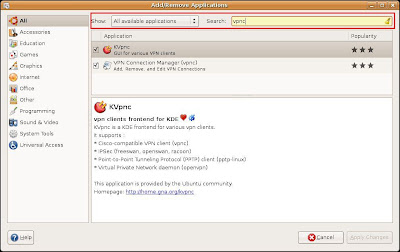
  • In UBuntu Linux, Go to Applications-->Add/Remove
  • Make sure you select "All Available Applications" for "Show", and type in "vpnc" in search box

  • You will get a couple of hits and 2 of them will be "KVpnc" and "VPN Connection Manager (vpnc)".
  • Select BOTH these by selecting the check boxes near them
  • Click On "Apply Changes" button at bottom right corner
  • Now, start your windows machine where Cisco VPN is installed. We are going to copy the VPN Profile file. Go to your Cisco VPN client profiles folder. By default, this is Program Files--> Cisco Systems --> VPN Client --> Profiles. You will see one .pcf file for each connection listed in your VPN client. Copy and make these files available in your Linux installation for our next step. If you are using UBuntu Linux in a virtual machine, like me, Refer to my Blog post for instructions on how to share folders between the Host and Guest operating systems in a VM Virtual machine.
  • Once the installation is complete, start KVpnc by going to Applications-->Internet-->KVpnc
  • Ince KVpnc starts, go to Profile-->Import Cisco pcf file.  Go to the folder where you saved the .pcf files, select the .pcf files you need imported, and click OK. 
  • Your KVpnc applicaiton is now ready for use. Just click on "Connect", provide required authentication information (userID/Password), and you will be connected to the network.

Installing Java Runtime (JRE) and Java Development Kit (JDK) in Ubuntu Linux

This post is a quick "how to" on installing Java in your UBuntu installation. My UBuntu installation is as a virtual machine, using VMWare. Please refer to my previous BLOG on how to set this up.

We will be installing JRE and JDK using apt-get. For this, open a terminal by selecting Applications--> Accessories --> Terminal.

Installing the Java Run Time (JRE)
To install JRE, type in the following command in terminal window
$ sudo apt-get install sun-java6-jre

Installing Java Development Kit (JDK)
To install JDK, type the following in terminal window
$ sudo apt-get install sun-java6-jdk


Install UBuntu Linux using VMWare

Recently I ordered an Alienware PC with 64Bit windows Vista OS. Like many others, I found myself in a fix when some of the softwares required for my work did not work. The Cisco VPN client was on top of the list. Without that, I cannot connect to my work network. I started searching for a solution, and came across VMWare Workstation. Basically, VMWare allows you to install multiple Operating systems as "virtual PC". Read more about this on their website http://www.vmware.com/. You will be able to download a trial version there.


This post is about how I got started on VMWare work station. The first OS I installed was UBuntu Linux version 8.04.1, 32 bit.


To start with, you will need the installation CD for the OS. You will be able to download it free from the UBuntu Website (Free... I like it!!!). Now, dont let the word "Free" fool you... in my experience, once I spent some time with this new OS, I found that pretty much everything I do with windows, i can do with this OS, PLUS, more... the softwares I spent money for getting, in Windows OS, they ALL came free here!! Now, the best part... you stuck with any problem.... head to Google, put the problem in the search box, and you will surely get the solution from those millions of users.


  1. Once you have the Ubuntu Installation CD, its time to create the virtual disk. Start VMWare Workstation. Select "New Virtual Machine"
  2. Select the "Typical" option, and click on "Next"
  3. In the "Install From" page, select the bottom most option which says "I will install the Operating System Later", and click on "Next"
  4. Select "Linux" as the Guest operating system, and in the drop down, select "UBuntu". Click on "Next"
  5. Select a virtual machine name. This is the name which will appear in your list of machines available. For now, leave the location as it is.
  6. Select the amount of hard disk space you want to allocate for this Operating System. I would recommend 10GB if you are serious in working with the new OS with some heavy apps. However, if you are just toying around, or dont plan to do much stuff with it, just give the OS something like 5-6 GB. I have always selected the option "Store virtual disk as a single file". Click on "Next"
  7. In this final confirmation screen, there is one thing we have to change. This change is because in my experience, this is required for VPN to work from within the virtual machine. Now, click on "Customize Hardware" option.
  8. Go to "Network Adapter". Select the option "Bridged: Connected directly to the physical network". Uncheck the checkbox which says "Replicate physical network connection state".
  9. If you are using a Multi core CPU, you can take advantage of this by setting the number of "Processor" as 2.
  10. Click on "Finish" to complete virtual disk creation.
  11. Once back in the initial screen, make sure you have the OS installation DVD in your DVD drive, and select "Power On this virtual Machine". You will see the VMWare logo..etc, and if the CD/DVD is bootable, you should see the OS Installation.
  12. Congratulations... you just created a "OS inside OS"!!!.